Why Does Your Car Always Seem to Lack a Bit of Soul?
After a late-night work shift, you step into your car and suddenly miss the ground; after a gathering with friends, you fumble in the dim light for the keyhole… Do these awkward moments make you feel like your beloved car is missing a sense of care? Try the Aoonuauto drilling door light—automatically projecting a logo’s light when you open the door, enhancing the feeling of ceremony in that unlocking moment and illuminating the area under your feet! Today, we’ll not only show you how to install it easily but also reveal how to transform your car into a master of ambiance in seconds!
Why Are Experienced Drivers Installing Drilling Car Door Lamps?
Safety Necessity: Precisely illuminates the area under the car door, avoiding the risk of missing steps or tripping.
Aesthetic Revolution: Customized brand logo/totem projections ensure you attract attention the moment you unlock your car in a parking lot.
Zero-Cost Value: A few hundred dollar investment makes your car appear high-end, potentially netting you thousands when reselling.
Waterproof Black Technology: IP68 waterproof rating ensures it works perfectly even in frost and heavy rain.
Three Key Pitfalls to Avoid Before Installation
Position Secrets: Use the positioning stickers per the manual and avoid the anti-collision beam! It’s recommended to position it 5-8 cm from the bottom edge of the door and centered.
Wiring Secrets: Prioritize connecting to the reading light circuit (it lights up when the door opens). Make sure to cover junctions with electric insulation tape to prevent leaks.
Drilling Tricks: Use a low-speed electric drill and press straight down; smooth out any burrs with sandpaper.
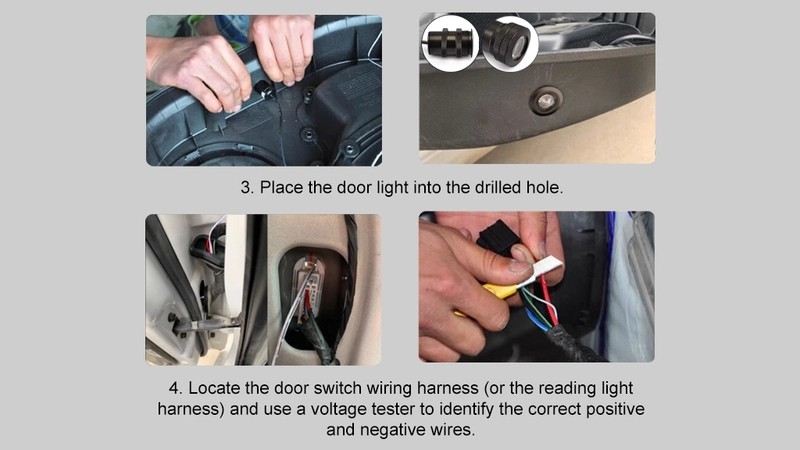
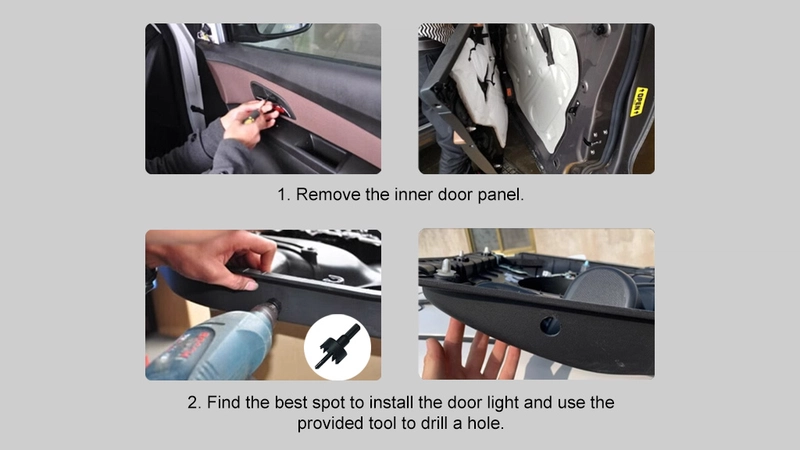
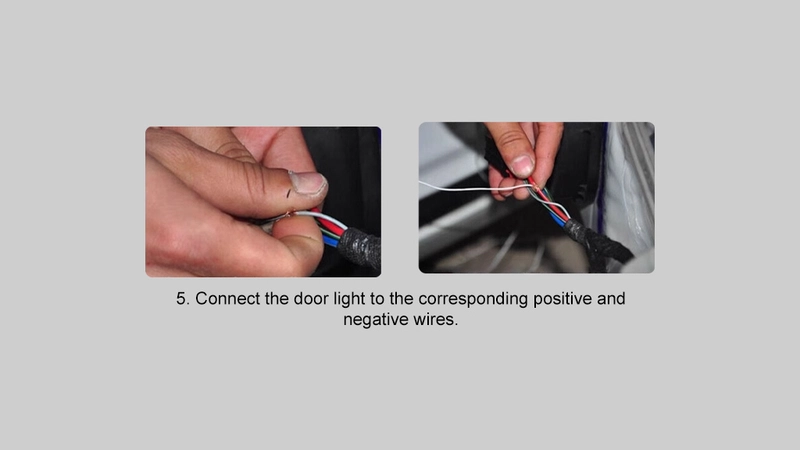
Installation Steps
First, test the received projection light to ensure it works properly.
Remove the inner cover of the car door.
Find the correct position and drill a hole using a punch.
Install the logo projection light. Tighten the screws to secure the light, then connect the positive and negative terminals to the wires controlling the door switch.
Check if the installation is correct. Is the light functioning properly? Adjust the logo’s direction for the correct display.
Tidy up the wiring and replace the cover.
With these simple steps and tips, you can easily install the drilling door light in your car, adding convenience and style to your driving experience. If you have any questions or need assistance with the installation process, please feel free to contact us—we’re happy to offer you more support. Let your car not only stand out while driving but also shine brightly when parked!